Tuesday 24 April 2012

How to make a Tin Man (and a Tin Lady and a Tin Baby)

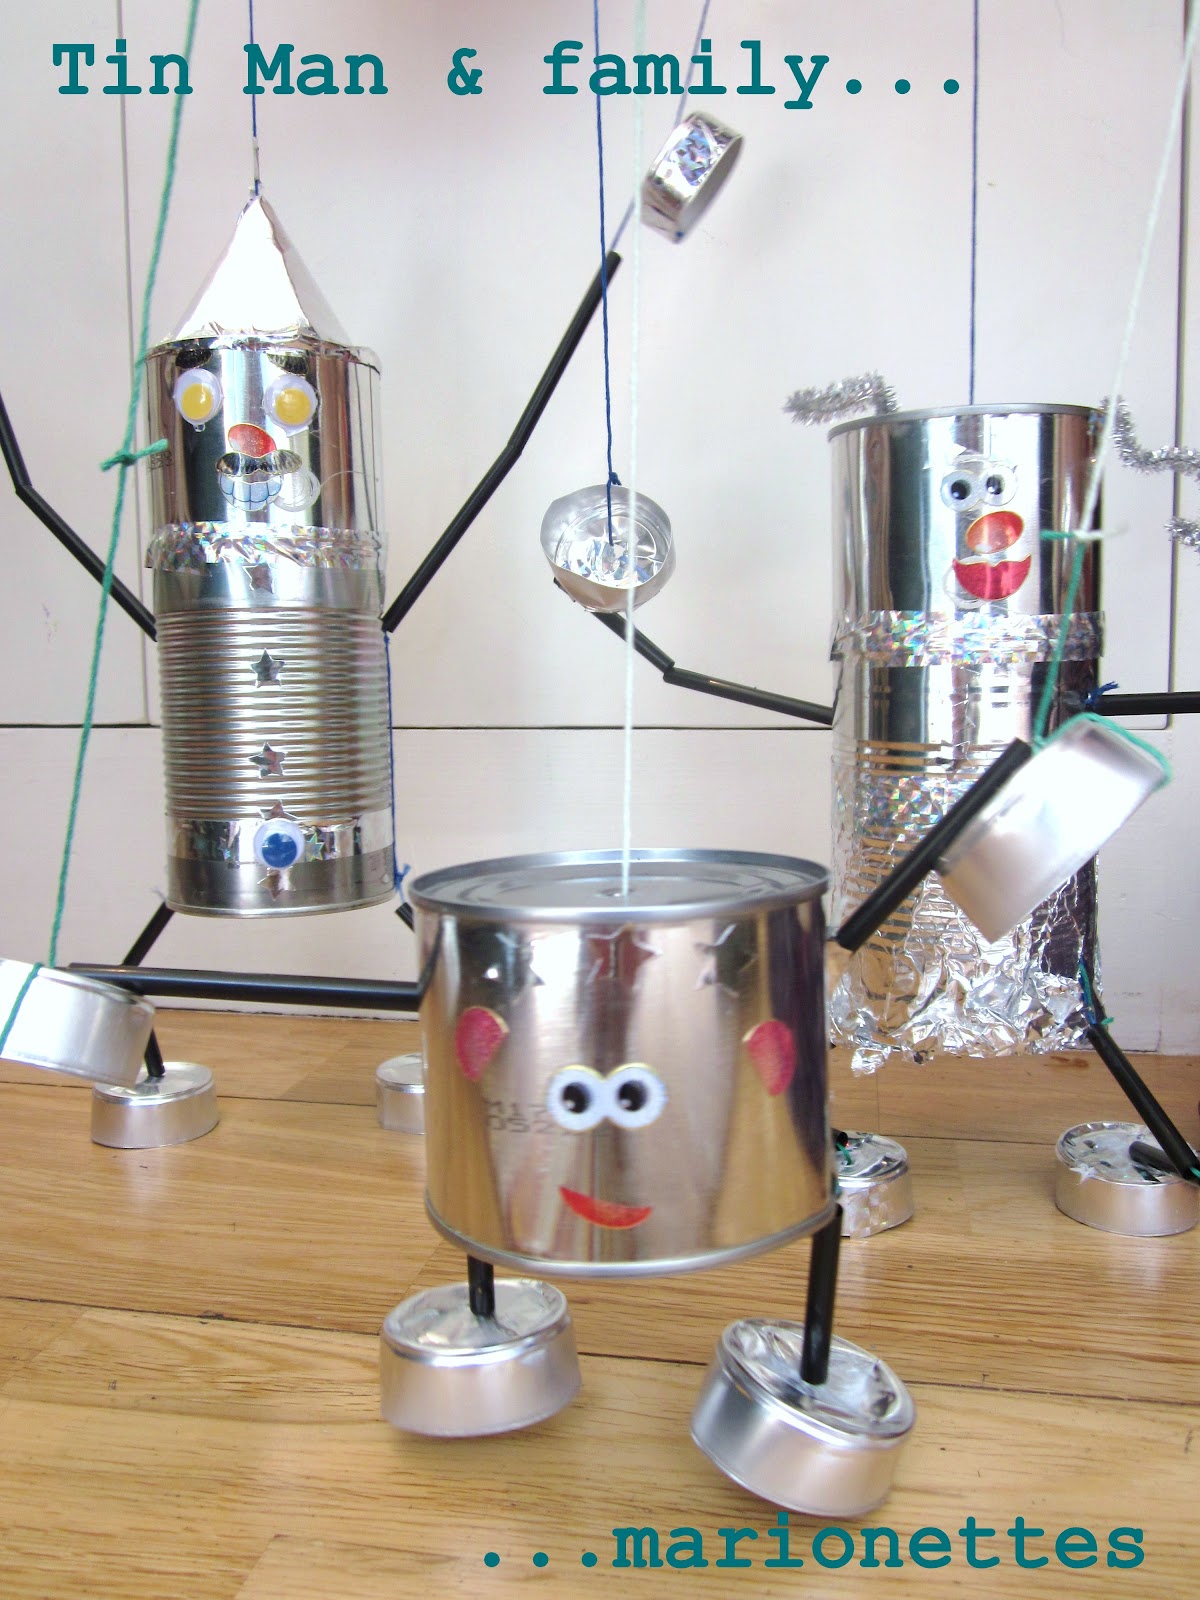
A trip to see the Wizard of Oz at the weekend, and a current museum project of mine which involves puppet-making research, gave me the idea to make a Tin Man marionette. My children were keen to join in - provided we also made a Tin Lady and a Tin Baby. So yesterday we made the whole Tin Family. It took a while, but we are thrilled with how they turned out. The way the puppets move is so funny, and they are full of character - we love them.


Here's what we used:

3 x small tin cans (heads)
2 x large tin cans (bodies)
12 x empty tea-light foils (hands and feet)
6 x drinking straws (arms and legs)
3 x 30cm sticks (operating rods)
5m colourful string
a selection of stickers and googly eyes (faces)
30cm tin foil (skirt)
silver foil sticky tape
15cm diameter circle of silver card (hat)
1 x silver pipe cleaner (hair)

Here's what we did:

1. First we selected our tin cans - Tin Baby used just one small can, Tin Lady and Tin Man each had one small can for their head and one large for their body.

2. Using a small and pointy-headed screwdriver (a bradawl would have been even better), I punched a hole in the centre of the top of each can.

3. I made two holes where I wanted the shoulder and hip joints to be on each large can (for Tin Lady and Tin Man) - and for Tin Baby I did this on the small can. I used the screwdriver again but this time someone had to hold the cans steady; it was definitely a two-person job.

4. Then the fun really began - it was time to make our characters:

i) my son made Tin Man - with googly eyes and stickers for bushy eyebrows and a moustache on the small can, sticker-stars as buttons and some shiny tape as a belt on the large can 
ii) my daughter made Tin Lady, with stickers for facial features and a silver pipe-cleaner for hair on the small can, and a tin-foil skirt on the large can. She decorated the shoes (tea-light containers) with some shiny tape 
iii) I made Tin Baby by adding some facial feature stickers to the small tin

5. When all the decoration was finished we were keen to see these characters come to life. I cut about fifteen hand-to-elbow-length pieces of colourful string in readiness - and then we began the rather fiddly job of threading all their bits together.

6. We threaded the head and bodies together first (using a blunt-ended darning needle) leaving about 20cm of string to attach to the operating rod. We also stuck each head and body together with some shiny tape to make the puppets more robust.

7. We threaded the arm-and-leg strings to each of the joint holes in the cans and then, having punched little holes through the centre of each tea-light container we threaded on the hands and feet.

8. The tea-light hands needed two further strings to attach them to the operating rod.

9. We made a hat for Tin Man from a cone of silver card which we stuck on with shiny tape.

10. Our last job was to cover the arm-and-leg strings with straws. Each straw was cut to the length of the arm or leg, then in half again to make an elbow or knee joint. Then I cut each straw along its length and wrapped them round the strings.

I thought our puppets were complete, but my daughter has just asked whether we could provide each one with a heart - just like in the story. I'm sure we will; that would be a lovely finishing touch for the Tin Family.


Thursday 19 April 2012

Cauldron cakes

1. Take one slab of solidified frog slime

2. Melt it in a cauldron over a puddle of bubbling, boiling pond water

3. Meanwhile take four goblets of dried frog skins and scrunch them in your (clean) hands

4. When melted, coat the frog flakes with the slime, and say some magic words

5. Finally, divide the crunchy mixture into equal portions and cool them in your cavern


Daisy's cauldron cakes

Thanks to Daisy for her inspired twist on we-forgot-about-the-cake-sale-till-the-last-minute chocolate cornflake treats. Our magical cauldron cakes will be available to all witches and wizards in the area tomorrow - for just ten pence each.


Sunday 15 April 2012

Beanbag tin can alley


How about this for an easy-peasy weekend game? 

My children got hold of our stash of empty tin cans this morning and began making towers. I found our beanbags and soon a game resembling both tin can alley (but without the guns) and ten-pin bowling (but without skittles or balls) evolved. It was brilliant fun with plenty of giggling and shouting, and lots of stacking...


...throwing


... and Final Score calculating.


Warning: if you attempt to photograph your family playing this game you will undoubtedly get a beanbag thrown with precision accuracy - right in the face. Ye-ouch.

Wednesday 11 April 2012

DIY Bakugan base


Meet Rex, Metal and Sky Raider - our first three Bakugan bought by my seven-year-old son with some of his birthday money. Apart from my friend mentioning she'd recently found an unwelcome and rather pointy Bakugan in her bed, I'd never heard of them before. But Buddy was adamant that this was what he wanted to buy.

Keen to be supportive, I attempted to help my children play Bakugan by reading out the game's rules which came with the set. We found them totally incomprehensible, and I felt rather grumpy about it; Bakugan seemed to be a bit rubbish - and quite possibly an utter plastic-tastic rip-off. I stepped away mumbling something like I think you roll them onto their cards and they pop open - and then my dears, your guess is as good as mine  - and left them to it.

Thankfully, five minutes later, my eavesdropping mummy-ears tuned into the most wonderful game being played - where each Bakugan had been named and where the Bakugan world (in the living room) revolved around their powers; rolling and popping open, swimming, battling and flying around - turning baddies into goodies. There were also parties, bedtimes and a wedding to attend - courtesy of Miss Daisy's input, I should think. What a fabulous way to play with them. Suddenly I didn't feel quite so grumpy.

The Bakugan base, pictured above, came about a little later when we were trying to think of something to make out of our newly empty cereal boxes. Daisy came up with the idea of a Summer box (pictured below) inspired by a new sun hat I'd bought her at the same time as the Bakugan purchase. As you can see it's full of summery things which she gleefully collected from around the house. It even has a mirrored lid so you can see if you've put the summer things on right. 


And Bud came up with the idea of the Bakugan base. We raided the recycling box for their bed, a transforming pad and an entrance tube and we made everything shiny - just as the Bakugan like it, apparently. So now they have somewhere to be stored and maybe, just maybe, I'll escape finding any of the pointy little fellows in my bed. 


Friday 6 April 2012

Shake, rattle and roll


We made these rather snazzy decorative eggs today. It was a messy project - with glitter galore - but it definitely worked a treat. It even got my sticky-hand averse son willingly involved with glue - a sure sign of success. 


1. First we covered the bottom of four small transparent plastic food storage tubs - ours were from IKEA - with different coloured glitter.

2. Then we each coated one of our small polystyrene eggs - from a local pound shop - with PVA glue. We began by using a little paintbrush to do this but soon found it quicker and easier to spread the glue on the eggs with our fingers.

3. Next we dropped the eggs - one at a time - into the glitter-bottomed tubs, wiped our sticky paws and then firmly closed the lids.

4. After that came the really fun part; to shake, rattle and roll the eggs round and round in the closed tubs - covering each egg with an even layer of glitter. 

5. The transparency of the tubs allowed us to check that our eggs were glitter-coated before we removed the lids.


6. The twinkling, and now non-sticky, eggs were then transferred to a plate to dry for about an hour.

7. We mixed up our leftover glitter to make a few multi-coloured eggs too.


This was a fun activity, with proper wows from the children as they transformed their white eggs to sparkling treasure. And now we're all ready for our egg hunt on Sunday. Happy Easter!